Showing posts with label gluten-free. Show all posts

Monday, October 30, 2017

Harvest Rice Bowl with Squash and Brussels Sprouts


Harvest Rice Bowl with Squash and Brussels Sprouts


This is my FAVORITE fall dish! It has all of the best parts of fall - delicious squash, caramelized brussels sprouts, apples, cranberries! As listed below, it makes a giant amount. Feel free to cut everything in half if you don't want as much food. Also feel free to switch out any of the ingredients. Want to use chopped figs or raisins instead of the craisins? Want to use pear instead of apple? Go for it!

Harvest Rice Bowl with Squash and Brussels Sprouts
Yield: 10-12 side servings
Adapted slightly from Iowa Girl Eats

Ingredients:
1 medium butternut or acorn squash (or 2 big sweet potatoes)
2 tbsp olive oil, divided
¼ tsp ground cinnamon
¼ tsp chili powder
¼ tsp garlic powder
2 lbs brussels sprouts
salt and pepper
1 1/3 cups brown rice
3-4 oz sharp cheddar cheese (white or yellow)
½ cup slivered almonds or pine nuts
½ cup dried cranberries
1 large (or 2 small) apple

Dressing:
¼ cup olive oil
¼ cup balsamic vinegar
2 tbsp honey
1 clove garlic, minced (or ½ tsp crushed garlic)
Salt and pepper to taste

Directions:
Preheat oven to 400 F. Peel and dice the squash into ~1/2 inch cubes. Toss with 1 tbsp olive oil, cinnamon, chili powder, garlic powder, and lots of salt and pepper. Spread out onto a foil-lined baking sheet and roast for 25-30 minutes, stirring a few times throughout, until soft and caramelized.

Trim brussels sprouts, and then shred (cut each one in half, and then slice the halves). Toss with 1 tbsp olive oil and salt and pepper. Spread out onto a foil-lined baking sheet and roast for 15-20 minutes, stirring halfway through, until tender and slightly charred.

Meanwhile, cook brown rice according to package instructions. If you have it, replace some of the water with vegetable stock. (We cook brown rice in our Instant Pot and it turns out perfectly every time - for this recipe you would want 1 2/3 cups of low-sodium vegetable broth or water)

Dice the cheese. Core and dice the apple (you can leave the peel on). Toast the nuts until golden brown and fragrant (5-7 minutes at 350 F usually works well).

Mix up the dressing – it works well to add everything to a mason jar and then shake up really well. Just make sure the lid is screwed on tight. 

Using a GIANT bowl, add rice, squash, brussels, cheese, apple, nuts, and cranberries. Toss well. Drizzle over some of the dressing and toss until everything is coated. You probably won’t need all of the dressing, so don’t pour it all on at once. Store leftover dressing in the fridge – it is good on salad.

Serve warm or at room temperature. 
If you are bringing this somewhere, the rice, cranberries, brussels sprouts and butternut squash can all be made and mixed up in advance. I would then re-heat that portion, and then mix in the cheese, nuts, apple and dressing right before leaving. 


Monday, July 24, 2017

Tips and Tricks for Making Perfect Macarons

I love baking macarons


They are so beautiful, so delicious, and honestly, impress anyone you share them with. They require some precision and patience, but really aren't the most difficult thing to bake. I am not a pastry chef and I'm certainly not an expert, but by following the advice and tips below, I have had success every single time I've made macarons. I wanted to share all of my tips in case they would be helpful for anyone else! This is very long (I'm sorry), but bear with me and I think you will be able to make your own beautiful macarons. 


Ingredients

You must use a kitchen scale! All of the measurements are extremely precise, and this is really the only way to accurately measure your ingredients. They aren’t that expensive to buy, and will make your life so much easier. A lot of recipes put ingredients with both volumetric and weight measurements, so you can use it for many other recipes.

Almond Meal

I've found that buying almond meal in bulk is the cheapest way to do it. This will be your most expensive ingredient, but if you get a lot of it, each batch of macarons will be incredibly inexpensive to make. I found a 3 lb bag of the good stuff (Bob's Red Mill) for only $13. If you do buy in bulk, keep a portion of it in the fridge and the rest in the freezer. The high fat content can cause it to go rancid if you leave it out. Let it come to room temperature before using it - it works well to pull it out at the same time you pull out your egg whites (see below). 

I have seen recipes that claim otherwise, but I have had the best success with blanched almonds that are super fine or finely ground. Blanched almonds have had their skins removed. You will get a much prettier, much smoother macaron with these tips (and you will save time sifting). 

Egg Whites

Always use fresh – do not use egg whites from a carton, they just won’t beat up properly.

Eggs separate best when they are cold, so separate the whites straight from the fridge. Then you need to let the egg whites 'age' for a bit. You can sit them at room temperature for 24-48 hours, or in the fridge for longer than 48 hours. If you do put them fridge, let them come to room temperature before using.

Do not get any traces of fat in your egg whites. Even a drop of egg yolk can prevent the whites from beating properly. I like to put a little vinegar on a paper towel and wipe down everything that comes in contact with the egg whites – the mixing bowl, the whisk attachment, the container the egg whites go into age. The vinegar won’t affect the taste or smell of the macarons.

Some recipes use cream of tartar to help stabilize the egg whites. I have never found this to be necessary, so I don't use it if a recipe calls for it. The red white and blue macaron recipe below calls for cream of tartar, and mine turned out perfectly without it.  

Colors

Do not use liquid food color – it will completely change the consistency of your batter. If you are going to add color, make sure to add powdered or gel/paste food color.

I have tried both Wilton and AmeriColor gel/paste food color, and I prefer AmeriColor. It is a little more expensive, but there are many features that I prefer. It comes in a squeeze bottle, so you don’t have to dip in dozens of toothpicks. This also allows you to be more accurate – once you figure out the correct number of drops to get your desired color, you can repeat that in the future. AmeriColor has given me more vibrant colors, and the colors don’t change after they have baked. (If you overbake your macarons, they will turn brown regardless of whose colors you are using.)

 
Wilton - even a TON of drops didn't make a very vibrant color, 
and the color faded after baking

Another side by side of before and after baking (Wilton)

AmeriColor - it took a lot, but I finally achieved a vibrant color
The color didn't change very much after baking

You will have the best chance of getting the color you want if you add the food color to your egg whites. It takes more mixing than you would think to get the color incorporated evenly, and you don’t want to overmix your batter in the process. I usually add a drop or two at a time, then beat the egg whites well to get the color mixed in while also trying to maintain the consistency.

This is just a recommendation, but I would suggest making separate batches if you want more than one color. If you have multiple bowls and whisk attachments for your stand mixer (or hand mixer) then you would be fine splitting your egg whites in half. Otherwise, I feel that the second half of the batch suffers.

Method

I have only done the ‘French’ method, versus the ‘Italian’ method. This means I beat my egg whites with granulated sugar, and then fold in the powdered sugar and almond meal. The other method involves a sugar syrup that is beaten into the egg whites. Many have had success with each method, so I’m not saying one is better than the other. The French method is the one that I have used, and I have had success every time.

Sifting

Sift 2-3 times. I know this sounds crazy, and I know it takes forever, but it is essential to a smooth macaron. First sift the almonds on their own (at least 2 times). Then you will want to sift the almonds and powdered sugar together, so they get mixed well prior to adding to the egg whites.

You want to use a sieve with fine pores. I made some recent batches with a larger sieve because I was lazy, and I could tell right away that the batter wasn’t as smooth. They turned out just fine, but I think I will go back to a fine sieve in the future for a better appearance.


These were my first two batches, back when I was being really careful about sifting
The piped macarons look smooth and shiny

By now I had become lazier, and I think that the macarons look less smooth

I tried to take some pictures of my two sieves, so you can see what two sizes I'm referring to. The pictures aren't fantastic, but you can see the one with the long handle has tiny diamond-shaped holes, while the holes in the free-standing sieve are bigger. You can use the bigger sieve for your final sift, when combining the almond meal with the powdered sugar. However, I recommend using the smaller sieve for the first two sifting steps. 
Small sieve on the left, larger sieve on the right

Close-up of the pore size

Mixing

I was most nervous about this part when I first made macarons. I had worked so hard to get fluffy egg whites and didn’t want to completely deflate them. Well it turns out that you do need to deflate them quite a bit! It is easiest if you use some kind of flexible spatula, I like the silicone style. Dump all of your dry mixture on top of your fluffy egg whites, and then push your mixture firmly from the middle out to the sides of the bowl. Turn the bowl a quarter turn after each push. Once everything is combined, keep folding your mixture until you can lift it up and a ribbon of batter drips off the end. It is okay if the ribbon is only for a couple of seconds before it breaks. Another way to test consistency is to make sure the ribbon that dripped off disappears into the batter within 20 seconds, but doesn’t immediately. It is okay to be a little under-mixed, since putting it into the piping bag and squeezing with your hand will continue mixing it a bit.

Piping

I trace circles onto parchment paper and then turn it over when piping, so I don’t get any pencil on the macarons themselves. I use a round cutter that is 1 ½ inches in diameter (from the Ateco round cutter set). Leave around 1 inch between circles in case of spreading. Always trace a few extra circles. Even though the recipe says it makes 30 sandwiches (60 macarons), you might make yours slightly smaller or bigger. You don’t want to be scrambling around while holding the dripping piping bag in your hand!

I have always used a disposable piping bag fitted with a Wilton 12 tip. This is just over ¼ inch (5/16 to be exact). If you are splitting up your batch, a 12-inch piping bag works really well (25-30 macarons, or 10-15 macaron sandwiches). I would recommend a larger piping bag for a full batch so you don’t have any batter that squeezes out the top.

The easiest way to fill a piping bag without getting it all over everything is to put it in a tall glass or vase. Fold over the top edges so they remain clean, and then transfer your mixture into the piping bag. Then you can un-fold the top edges and roll them down so you have all of the batter trapped inside.
This is not an example of making macarons!
I was making two-toned frosting for cupcakes
However, it does show how to use a tall glass for a piping bag

I do not like using a coupler – this is really useful when you need to switch tips for the same batch of frosting, but if you are using the same tip throughout you just end up having a lot in the bag that you can’t use. If you just snip off the end of your piping bag you can easily slide your tip in without a problem.

If you want to make a few colors at the same time, I recommend getting a few of the same size piping tip. Otherwise you will have to quickly remove the tip from one bag before moving onto the next.

When piping, hold your piping bag completely vertical in both hands. I like putting my dominant hand toward the top, to control the flow, with my non-dominant hand toward the bottom to help steady. Put the tip about a half inch above the parchment paper, directly in the center of your traced circle. Squeeze gently and with constant pressure until you have just barely filled the circle. The batter will come up the side of the tip while you are doing that. Some recommend a fancy wrist flick while finishing piping to give you a smooth top, but that has never worked for me. Just follow the tips in the next section and you can fix any bumps in the top. 

Before the oven

As soon as you pipe out the macarons, you want to gently tap the baking sheet on a flat surface to get any air bubbles out. Be very careful – you don’t want to drop the sheet!

Use a dry small paintbrush (like one you would use for watercolors) to very gently smooth out any imperfections. I always end up with a little ‘nipple’ at the top. I tried a few different techniques to try to get rid of it, and the paintbrush works wonders. I tried using a damp fingertip, but the extra water messed up the texture (see below). I’ve also tried using a toothpick, but it would stick to the batter and honestly make it look worse than it started. Using a paintbrush helps gently coax the batter into the shape you want. This way you can get rid of any bumps on the top, as well as smooth out any air bubbles that rise to the top. 

See the off-color spots on the blue macarons?
That is where I used a wet fingertip to smooth down the tips
Don't do that!

If you want to top with any edible decorations, now is the time to do it! The macarons will start to dry quickly (this is a very good thing), so the window of time to get anything to stick to them is small. You can add sprinkles, a sprinkle of cinnamon, edible flowers. Just make sure that you don’t add anything too heavy that will interfere with the bake.

This is important - let the macarons dry out a bit before baking them. I mentioned a few times that they will dry quickly, but this all depends on the weather. This will take anywhere between 15 and 60 minutes. They will be ready to bake when they are no longer shiny and they do not feel sticky when you touch them very lightly. If you skip this step, you might not get the pretty 'feet' at the bottom that are what give the macaron their signature look. 

Baking

I have found that the baking temperature and time actually depend on how runny your batter is. In my latest batch, I had split everything in half to make two different colors. My first half of the batch was slightly thicker, and did not spread at all once they were piped. These did very well in a 300 F oven and were perfectly baked after 16 minutes. They also peeled off of the parchment paper perfectly. My second half of the batch was a little runnier – they spread a little after piped (completely normal). They started to brown before they were cooked completely through, and I think would have benefitted from a slightly cooler oven with a longer baking time.

You don’t want to underbake your macarons. If they are gooey when they come out, that ends up collapsing after they cool, and you end up with macarons that are hollow in the center. Make sure that if you touch them gently (very very gently), they do not jiggle at all or move away from the ‘foot.’
Bake only one sheet at a time. They have a relatively quick baking time, so the other sheet of macarons can wait until the first one is done.

This is an underbaked macaron - the center collapsed slightly leaving a hole

This is very important – cool COMPLETELY before even attempting to get the macarons off the pan. If you take them off too soon they will stick. Once cooled, they should peel off easily. Don’t worry if there is a little residue left on the parchment, or if the bottoms are a little wrinkled. You won’t see anything once they are filled.

Filling

This is the main way you are going to add flavor to your macarons. The most popular fillings are jam (or curd), buttercream and ganache. When choosing a filling, think about how long it will be until you serve them. The softer and wetter the filling, the quicker the macarons will need to be served before they become soft and soggy. Ganache lasts the longest, and I know from experience that macarons filled with ganache can be refrigerated or frozen with no negative effects.

The macarons themselves are pretty sweet, so I like using a filling that is a little bitter or tart. Cream cheese frosting or buttercream adds a nice tang, lemon curd gives a tart pop, and a bittersweet chocolate ganache provides an intensity to a dessert that could otherwise be one-note sweet. You can always do a combination – one day I would love to pipe a ring of buttercream around the outside and fill in the center with lemon curd.

To get pretty sandwiches, line up your macarons in size order before filling. Choose two that are of similar size to go together. You will have a range in size, even if you use a guide while piping. Depending on whether you were at the beginning or end of your batch (or if you made multiple batches), some will spread more than others. It works best if you decide in advance which two are going together.

Choose the macaron that is flatter to be on the bottom, otherwise it will roll all over the place while you are trying to fill it.

* If you are putting together macarons of different colors, or have another reason why you can’t match the size, make sure to put the filling on the smaller of the two. This will prevent filling from coming out the sides and making everything messy.

I recommend a layer of filling that is roughly equal to the height of one macaron cookie. Add your filling to the bottom cookie (either pipe or spoon it), gently place the other cookie on top, and then give a slight twist to the two macarons (in opposite directions). The twist allows you to adhere the macarons to each other and the filling without having to push and risk damage.

If you want to pipe your filling using a star tip, I recommend Wilton 21.
Buttercream piped with Wilton 21 (star tip)

If you are using a ganache that is still a little warm (and hasn’t thickened up completely), make sure to just put it on the center of the macaron since it will squeeze out to the sides. If you are using a filling that is already in its final state, then make sure to put it all the way to the edges.

Transportation and Storage

Now that you’ve made some beautiful macarons, you want to bring them somewhere to share (and show off a little). They are incredibly fragile, so you need to be careful otherwise you will end up with a lot of broken shells. Think about when you go to a fancy pastry shop – they have fancy little boxes for macarons with them all on their sides. This is because the top/bottom of the macaron are the most delicate, but the sides are a little sturdier.


If you will be consuming the macarons soon, you should keep them in the refrigerator. This is especially helpful when you have filled them with something on the softer side, like jam, curd or buttercream. Allow them to sit out for a few minutes to come to room temperature before eating.
Most macarons will freeze beautifully. The shells will always freeze perfectly, you just need to make sure the filling does as well. I have had great success freezing macarons filled with ganache. Just let them thaw before eating.

Recipes I have had success with

https://theculinarychronicles.com/2011/04/15/vanilla-bean-macarons-with-dulce-de-leche-buttercream/ (didn’t use vanilla bean or the buttercream, but I’m sure they would have been delicious)


https://theculinarychronicles.com/2016/03/20/chocolate-and-peanut-butter-macarons-happy-macaron-day/ (didn’t use the peanut butter buttercream, used the ganache below)


Fillings

https://smittenkitchen.com/2008/08/chocolate-peanut-butter-cake/ (Used the ganache from this recipe, with bittersweet chocolate)
http://thepioneerwoman.com/food-and-friends/how-to-make-lemon-curd/

Tools

Some of these I own, some of them are just examples of what I think I would be very useful


Round cutter (around 1 ½ inches) - this is the set I have

Wilton 12 tip (part of my kit)

Wilton 21 tip (part of my kit)

AmeriColor gel food color kit - I own and recommend

Watercolor brushes - this is overkill, but an example of what you can look for


Kitchen scale - I own and recommend


Disclosure - I have included affiliate links in this post. If you buy any of the products I recommend on Amazon, I get a tiny tiny percentage of the sale, but it's still the same price for you

Monday, July 17, 2017

Perfect Brown Rice (Instant Pot)

I am not being paid to say this, but I love my Instant Pot. It is big and it takes up a lot of space, but it cooks so many things perfectly for me. One of them is brown rice. I used to cook rice on the stove, and I would always end up over-cooking or under-cooking it, and it never seemed to take the same amount of time every time. Now I know that I can throw the ingredients in the pot, turn it on, and come back to perfectly cooked rice. I'm not going to pretend to tell you that the Instant Pot takes less time. By the time it reaches pressure, cooks, and then the pressure drops, it takes just as long as doing it on the stove. Every minute is hands-off, so you can just start it and walk away.

Note: I am listing amounts of rice below, but you can cook as little (or as much) as you want. Just make sure to use 1 1/4 cups of liquid for every 1 cup of rice.
This is mostly unseasoned brown rice, so it is very versatile for any meal. Feel free to add salt to taste if you are eating it on its own.

Ingredients:
1 cup brown rice
1 1/4 cups vegetable stock (or water)

Directions:
Add the rice and vegetable stock (or water) to the inner pot of your Instant Pot.

Put on the lid, and make sure the valve is set to 'sealing.' Press manual and then press + until the display reads 23. After that you don't need to press any buttons - it should beep when starting within a minute.

After it has finished cooking, the machine will beep several times. Let it cool for at least 10 minutes before doing a quick release on the lid. The machine will automatically switch over to 'keep warm' mode. If you press the keep warm/cancel button at the bottom right, it will turn everything off and will generally come down from pressure more quickly. When releasing pressure, use a towel to protect your hand and quickly flip the valve from 'sealing' to venting.' A lot of steam will come out as soon as you switch it, so get your hand out of the way to avoid burns! Otherwise, you can wait until pressure releases naturally.

Use a spatula or a rice paddle (shown below) to scoop out all of the rice and put in a container to cool. Use immediately, or let cool and store in the fridge and use within 1 week. It will become fluffy again once reheated.

Tuesday, June 13, 2017

Instant Pot Steel Cut Oats with Fruit Compote

I love breakfast. On the weekend, I’ll sleep in and then enjoy pancakes, poached eggs over homemade bread, or omelets stuffed with veggies and cheese. But during the week I need something that can be prepped in advance, and something that will keep me full until lunch.

Lately I’ve been loving steel cut oats. They feel more substantial than regular rolled oats, have a nice chew and a nutty flavor, and have some added nutritional benefits. I cook up a big batch on the weekends and portion it into containers so I can have an easy breakfast every day of the week. I top the oats with some homemade fruit compote, fresh berries, and stir in some greek yogurt.

You can make steel cut oats on the stove or in an Instant Pot. Since we got our Instant Pot as a wedding gift, we have been using it for everything! It makes perfect steel cut oats and brown rice. We have even made homemade greek yogurt using the yogurt setting! However, if you don’t have an Instant Pot, no problem! I made steel cut oats on the stove for years. I am including modified ingredients and instructions for the stove-top version at the bottom.

I am also including a very simple recipe for fruit compote. You can put ANY kind of fruit you like! The best part is that you can use fresh or frozen fruit – it will just take a little longer to cook if it is frozen. I usually use ½ cup of chopped strawberries and ½ cup of frozen mixed berries. The strawberries are typically from what is about to go bad from our fresh berries. The cartons never last the whole week! If I don’t need to make compote right away, I’ll just wash and chop the strawberries and throw them in the freezer in ½ cup portions. I like getting frozen berries in bulk. We get a 3 lb bag at Sam’s Club. The latest kind they had was under $8 and included raspberries, blackberries and blueberries. My favorite version included strawberries and sweet cherries as well, but it isn’t currently in stock. 

Steel Cut Oats Ingredients (Instant Pot version)

1.5 tablespoons butter (unsalted or salted is fine)
1.5 cups steel cut oats (not quick cook)
Zest of one orange
Pinch of salt (omit if using salted butter)
4 cups water
1 ¼ cup milk (I always use unsweetened almond milk)
Juice of ½ orange (about ¼ cup of juice)

 Steel Cut Oats Instructions (Instant Pot version)


Plug in your Instant Pot. Press Saute and make sure it lights up below “Normal.” Press the plus or minus keys if you need to change the setting.


Add the butter to the pot and let it melt.

Add the oats and orange zest and stir well. Sauté for 3 minutes, stirring occasionally, or until slightly golden and the oats smell toasty.


Press Keep Warm/Cancel to stop sautéing.

Pour in the water and milk and stir well.

Put the lid on your pot, make sure to lock it properly, and set the lid to “Sealing.”

Press Manual and then hit the plus or minus buttons until the display reads “3.”


It will take ~5-10 minutes to come up to pressure, depending on how cold your ingredients are. Then it will count down the 3 minutes to cook. The machine will beep once the 3 minutes are up. Do not open the lid right away! You need to let the pressure come back down first. I always wait 10-20 minutes to let it mostly naturally release. Then, protecting my hand with an oven mitt or towel, I quickly flip the valve from “sealing” to “venting” and move my hand out of the way. Unless the pressure has already naturally released, quite a bit of steam will come out of the valve.

Once you have the lid off, use oven mitts to pull out the inner pot. Give everything a good stir (it will look too liquidy at first, but it all mixes in). Add in the orange juice and stir again.


Let cool and portion into containers, or serve immediately with greek yogurt, fruit compote, and fresh berries.

To reheat:
Spoon some compote on top of the oats. Microwave for 1 minute 15 seconds (adjust as necessary depending on the power of your microwave). Stir in cut up fresh berries* and greek yogurt or milk to achieve desired consistency.

* I like putting the berries on top before microwaving so they get cooked down a little. 

Fruit Compote Ingredients:

1 heaping cup of chopped fruit (fresh or frozen)
¼ cup fresh orange juice (from ~1/2 orange)
2 tablespoons white sugar
1.5 teaspoons cornstarch

Fruit Compote Instructions:

Add all ingredients to a small pot, stir well. Cook over medium heat, stirring occasionally, until it starts to boil. Reduce heat to medium-low and cook, stirring frequently, until berries pop and juices have thickened. 


Steel Cut Oats Ingredients (Stove-top version)
Adapted slightly from Cookie and Kate


4 ½ cups water
1 ½ cups milk (I always use unsweetened almond milk)
1.5 tablespoons butter (unsalted or salted is fine)
1.5 cups steel cut oats (not quick cook)
Zest of one orange
Pinch of salt (omit if using salted butter)
Juice of ½ orange (about ¼ cup of juice)

Steel Cut Oats Instructions (Stove-top version)


Heat milk and water in a large pot over medium heat.
Melt butter in a large pan over medium heat. Add oats and orange zest and cook 2-3 minutes or until golden and they smell nutty, stirring occasionally.
Stir the oats into the milk and water (carefully, to avoid splashes). Reduce heat to medium-low and simmer gently for 20 minutes. The mixture should have thickened slightly.
Stir in salt and continue to simmer, stirring occasionally, until very thick. Stir in the orange juice.
Let cool and portion into containers, or serve immediately with greek yogurt, fruit compote, and fresh berries. 

Friday, September 27, 2013

Spaghetti Squash Marinara

Joey and I watch Food Network A LOT. We religiously watch Iron Chef every week (and Next Iron Chef, when it's on), and have seen almost every episode of Chopped. Guy Fieri kind of annoys us, but we still watch Diners, Drive-Ins and Dives sometimes. Joey was watching it one day when he saw them making something that sounded really great. He found the video on youtube, and then we proceeded to watch it, pausing every few seconds so we could write down what they were doing.


They were making spaghetti squash marinara. You cook the spaghetti squash, and then fork it out to get nice long spaghetti-like strands, and mix that with marinara sauce and a bunch of cooked veggies. You dump all of that back into your spaghetti squash shells, top with fresh mozzarella cheese, and put it in the oven until the cheese is nice and melty. We've made this a bunch of times now, but usually always use store-bought marinara. This time we decided to make our own, and it was really tasty!

This was a perfect date night dinner, accompanied by a glass of white wine :)

*Also, this recipe is completely gluten-free! Granted, spaghetti squash doesn't exactly = spaghetti. I still think this counts as a really filling meal, and you forget that it's basically entirely veggies (plus cheese).

Recipe: Spaghetti Squash Marinara
Adapted from Diners, Drive-Ins and Dives
Yield: 2 LARGE or 4 small servings

Ingredients:
1 large spaghetti squash
olive oil
s&p
1 cup carrots, julienned
1 cup cauliflower, in bite-size pieces
1 cup broccoli, in bite-size pieces
1 medium zucchini, chopped
1 cup mushrooms, chopped
1 small onion, chopped
1 jar marinara sauce (or make your own! recipe below)
2 balls fresh mozzarella, sliced

Directions:
Preheat oven to 400 F. Line a baking sheet with foil.
(Carefully) cut open the spaghetti squash, and scoop out the slimy stringy flesh and seeds.
Rub the open sides with oil and sprinkle with salt and pepper. Place cut-side down on the baking sheet, and cook until tender, about 40 minutes.
Remove from oven and set aside until cool enough to handle.
Turn oven temp up to 450 F. Line a large baking sheet with foil. Put the carrots, cauliflower, broccoli, zucchini, mushrooms and onion on the sheet, toss with 1 tbsp oil and salt and pepper. Roast for 20-30 minutes, stirring every 20 minutes.
Once the spaghetti squash is cool, take a fork to scrape out the flesh. Run the tines of the fork down the squash, from stem end to bottom, creating long strands. Be careful not to puncture the skin. Put the squash in a large bowl, and mix in the marinara sauce and cooked veggies. Carefully fill the squash halves with the veggie mixture.
Lower oven temperature to 350 F.
Top with the fresh mozzarella, put back on the foil-lined sheet, and put in the oven. Cook for ~20 minutes, or until the veggies are bubbling and the cheese has melted.
Let cool a few minutes before serving.

Recipe: Homemade (Easy) Marinara Sauce
Adapted slightly from Barefoot Contessa

Ingredients:
1 tbsp olive oil
1.5 medium yellow onions, chopped
5 large cloves garlic, minced
1/2 cup red wine (we used red cooking wine - don't judge!)
28oz canned crushed or diced tomatoes
1 tbsp chopped fresh flat-leaf parsley
3 sprigs fresh thyme
1 tsp dried thyme
1 1/2 tsp kosher salt (we used 1 tsp since the cooking wine was salted)
1/2 tsp black pepper

Directions:
Heat oil in a large (at least 12 inches) skillet over medium heat. Add onion, and cook until translucent - 5-10 minutes. Add garlic and cook for another minute. Pour in the red wine, and scrape up all of the browned bits on the bottom of the pan. Increase heat to high, and cook until the liquid has mostly evaporated. Add the tomatoes, parsley, thyme, salt and pepper. Reduce heat to low, cover, and cook for 15 minutes, or until the sauce has thickened.

Ready to be baked - coated with oil, salt and pepper


Just out of the oven! Look at that melted cheese

My half, with a glass of white wine. Don't judge the crazy messy coffee table with all of my stuff everywhere (don't you like my nail polish colors?)

Tuesday, April 16, 2013

Recipe: Bananarama Bars


Updated 9/15/17:
This was my first recipe post! 4.5 years later, it is time for an update. I actually came across this while looking for ideas for afternoon snacks or pre-workout fuel for my husband. I had been making him Morning Glory muffins, but I think he got a little sick of them. I dug into my archives to find this post, and realized it desperately needed an update! I altered some of the ingredients and directions so it is more accessible to whatever you have on hand. These bars/cookies are awesome, and you should try them! Added benefit - if you use certified gluten-free oats, these are 100% gluten free!

I have a hard time eating much right before a workout. I've been relying on GU Chomps for energy, but sometimes I'm just STARVING and a few gummies won't cut it. Most snacks that are big enough to take the edge off my hunger, just sit too heavily in my stomach. However, I've found that a granola bar is pretty energy dense, while still allowing me to work out or run just fine. I've made Alton Brown's recipe a few times now (another post on that later), and my only complaint is that they go so quickly! Last week, Joey pointed out this recipe, and I finally gave it a try last night.
http://www.alliswellthateatswell.com/2011/09/bananarama-power-not-your-average-power.html

Recipe: Bananarama Power Bars
Ingredients:
2 large ripe bananas, mashed with a fork
2 cups old fashioned oats
1/2 cup milk (any milk of choice - I usually use almond milk)
1 egg
2 tbsp melted unsalted butter
1/2 tsp vanilla extract
2 tbsp honey
1/4 cup sugar (or splenda)
1 tbsp ground flax (optional)

Mix-Ins (choose as many or as little as you like!)
5 dates, chopped
1/4 cup chopped pecans (toasted!)
1/4 cup dark chocolate chips
1/4 cup shredded coconut

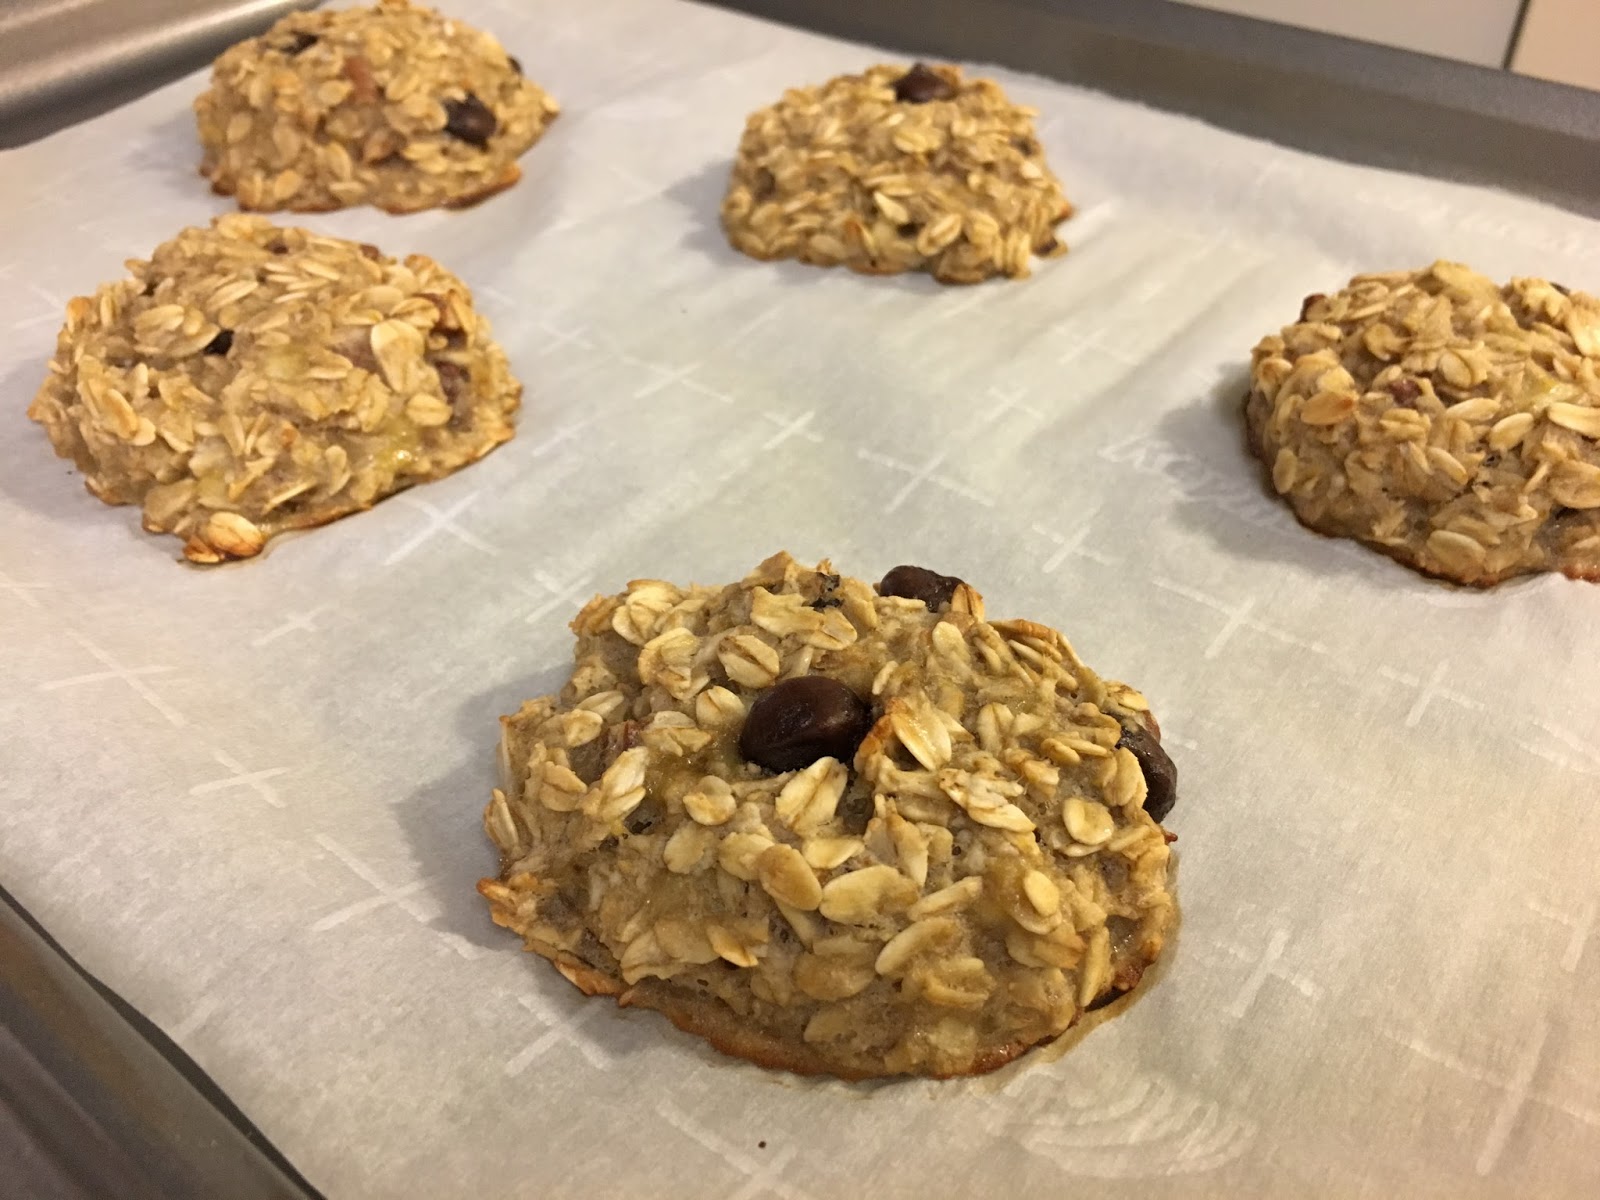
Preheat oven to 375 F. Mix everything together in a large bowl. Line 2 baking sheets with parchment paper. Using a large cookie scoop (or ice cream scoop), place batter on baking sheets, flattening tops slightly. Put 5 on each sheet. Bake for 10 minutes, then switch positions of the baking sheets in the oven (swap top and bottom). Bake another 10 minutes, or until golden and the bars feel set when you lightly touch them. 

Notes:
Feel free to add as little or as many of the mix-ins as you want! I really like pecans+chocolate. My husband loves pecans+chocolate+coconut. Dates+pecans would also be fantastic!

I have successfully made these adding in some protein powder. I even used banana flavored protein powder to amp up the banana flavor! If you do this, just sub out an equal amount of the oats. For example, if you add in 1 scoop of protein powder, then make sure when you measure out 2 cups of oats that you subtract 1 scoop.

Ground flax adds fiber and nutrients without affecting the taste. Make sure to use ground and not whole flax seeds, to really get the full nutritional benefit.

If you only have one banana, feel free to cut the entire recipe in half! Every ingredient is pretty easy to divide in half - and just use 1 egg white instead of a whole egg. If you bake half of the recipe, just keep them in for the entire 20 minutes - you don't need to worry about swapping positions in the oven.

    
Before they were baked (left), After they were baked (right)